Getting Started 🔗
Welcome to the online documentation for the Audition testing framework. Offline documentation is available for Linux users via the Audition man page which you can access by typing man audition in your shell after installing Audition.
Audition is a modern xUnit testing framework for C11 and beyond. It provides numerous quality-of-life improvements over other C unit testing frameworks, including automatic test registration and generic assertion macros. Additionally, Audition features a robust mocking system and a sandbox mode for running tests in an isolated address space.
Before you begin using Audition you must first install it. The remainder of this page will guide you through the installation processes. Once you’ve installed Audition you’re ready to learn the basics.
Supported Platforms and Compilers 🔗
Audition is tested on real hardware running Windows, Linux, Apple Silicon, and emulation via QEMU and Virtual Box. It has been tested in the following environments:
| Architecture | Environment | Compilers |
|---|---|---|
| AArch32 | Linux 5.15 | GCC 11 |
| AArch64 | Linux 5.15 | GCC 11 |
| AArch64 | macOS 13.6 | Clang 14 |
| AArch64 | macOS 15.1 | Clang 14 |
| MIPS | Linux 5.15 | GCC 11 |
| MIPS 64 | Linux 5.15 | GCC 11 |
| RISC-V 32 | Linux 5.15 | GCC 11 |
| RISC-V 64 | Linux 5.15 | GCC 11 |
| x86 | Linux 5.15 | Clang 12, GCC 11 |
| x86 | Windows 10 | MSVC 2019, Clang-CL 14 |
| x86 | Windows 10 | MSVC 2022, Clang-CL 19 |
| AMD64 | FreeBSD 13.1 | Clang 13 |
| AMD64 | Ubuntu 22.04 LTS | Clang 14, GCC 11 |
| AMD64 | Ubuntu 24.04 LTS | GCC 13 |
| AMD64 | Fedora 40 | GCC 14 |
| AMD64 | Fedora 41 | GCC 14 |
| AMD64 | NetBSD 9.3 | GCC 7.5 |
| AMD64 | Windows 10 | MSVC 2019, Clang-CL 14 |
| AMD64 | Windows 10 | MSVC 2022, Clang-CL 19 |
| AMD64 | Windows 10 | MinGW GCC 11, Clang 14 |
The binary releases of Audition are limited to Windows, macOS, the latest long-term support releases of Ubuntu, and the maintained releases of Fedora Workstation. To build for other operating systems and architectures, you must license the Audition source code.
Installing Audition 🔗
The section will guide you through the installation of Audition on your system and its configuration with your C environment
Once Audition is installed you can integrate it with your C project by following the Discovering Audition guide.
Installing Audition On macOS 🔗
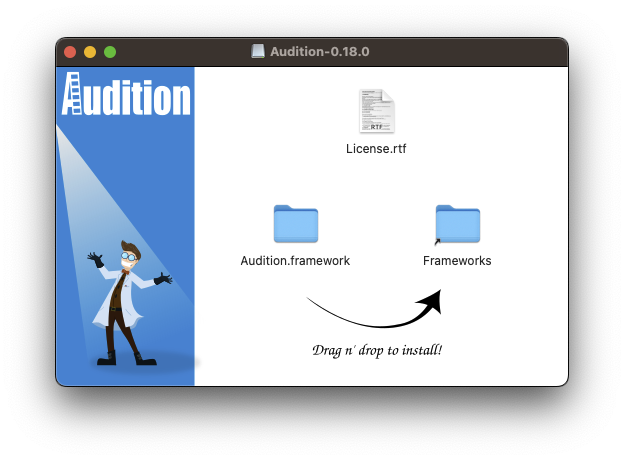
To install Audition on macOS, first download the latest .dmg from the downloads page, double click the disk image to mount it, then drag-and-drop Audition.framework into your Frameworks folder.
You can now discover Audition.framework from Xcode just as you would any other framework. You can also discover Audition with CMake.
Installing Audition On Linux 🔗
The binary release of Audition is available for both Ubuntu LTS and Fedora Workstations.
To install Audition on your Linux system, download and install the deb (Ubuntu users) or rpm (Fedora users) from the downloads page.
Audition is built as a generic Linux binary and links against glibc which Ubuntu and Fedora both use. If you need to link against a different version of libc or you need to use Audition on a different Linux distribution, then you must build it from source. You can obtain its source code by purchasing a business license.
Discovering Audition 🔗
This section outlines the various ways Audition can be discovered and integrated with your projects after being installed on your computer.
Discovering Audition with CMake 🔗
The easiest way to discover Audition with CMake is to install Audition using an installer program (i.e. deb, rpm, dmg) and then use find_package to find it. If you’ve downloaded Audition via an archive (i.e. a zip file), then find_package will not work and you must manually configure it with CMake using find_library and friends.
find_package(Audition REQUIRED)Assuming you did find Audition with find_package, you can then use the AUDITION_INCLUDE_DIR and AUDITION_LIBRARY variables to refer to the Audition library and header directory.
include_directories(${AUDITION_INCLUDE_DIR})
link_libraries(${AUDITION_LIBRARY})
One “gotcha” to watch out for is that Audition requires C11 and Visual Studio, at the time of this writing, defaults to C89. You must change the version of the C standard MSVC uses by setting the CMAKE_C_STANDARD variable in your CMakeLists.txt as shown below:
set(CMAKE_C_STANDARD 11)
You can review a complete example in the Audition examples CMakeLists.txt.
Discovering Audition with Meson 🔗
On systems with pkg-config, Meson should find Audition with the dependency function.
audition = dependency('audition')On systems with CMake, Meson should find Audition through CMake's find_package function.
audition = dependency('Audition')Discovering Audition with pkg-config 🔗
If you’re on Linux and have pkg-config installed, you can execute the following command in your terminal to discover the Audition library and header.
$ pkg-config audition --cflags --libsYou can run this command from your build system of choice (e.g. your Makefile, Autotools, etc.) to discover Audition.
Discovering Audition with Visual Studio 🔗
This section explores how to manually setup Audition with your Visual Studio project. If you generated your Visual Studio project with CMake, then you can disregard this section because CMake configures it for you.
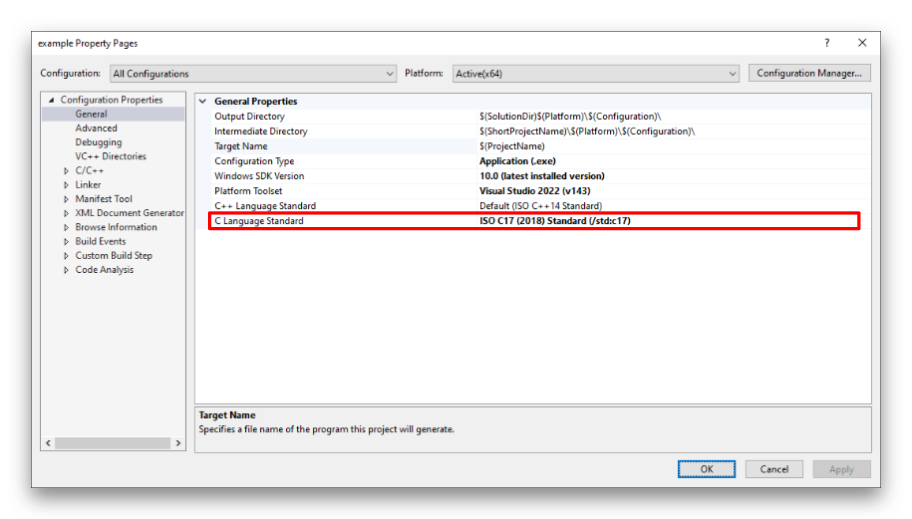
To configure Audition with your Visual Studio project, start by opening the property page of your test runner project. Once opened, navigate to Configuration Properties ➔ General ➔ C Language Standard and set the C standard to C11 or newer. This is necessary because Visual Studio defaults to C89, but Audition requires C11 or newer.
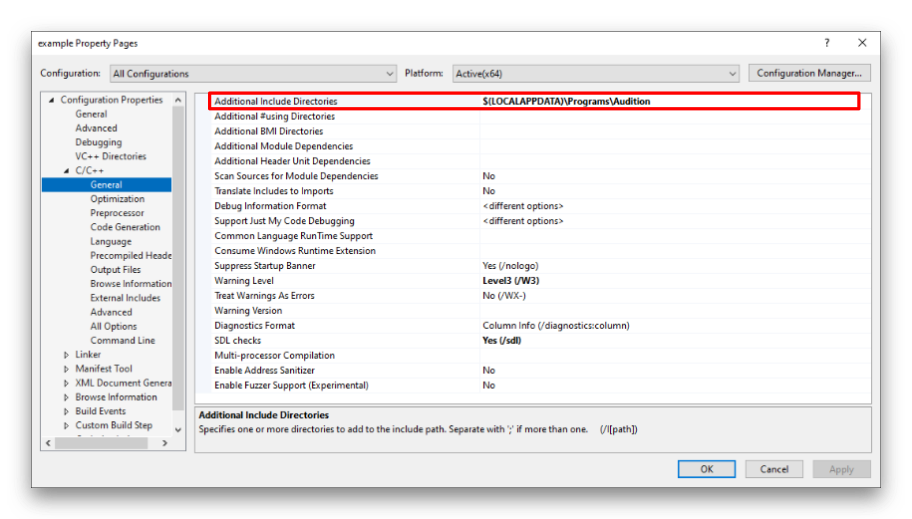
Next, under Configuration Properties ➔ C/C++ ➔ General add to the Additional Include Directories the path where the Audition header file resides.
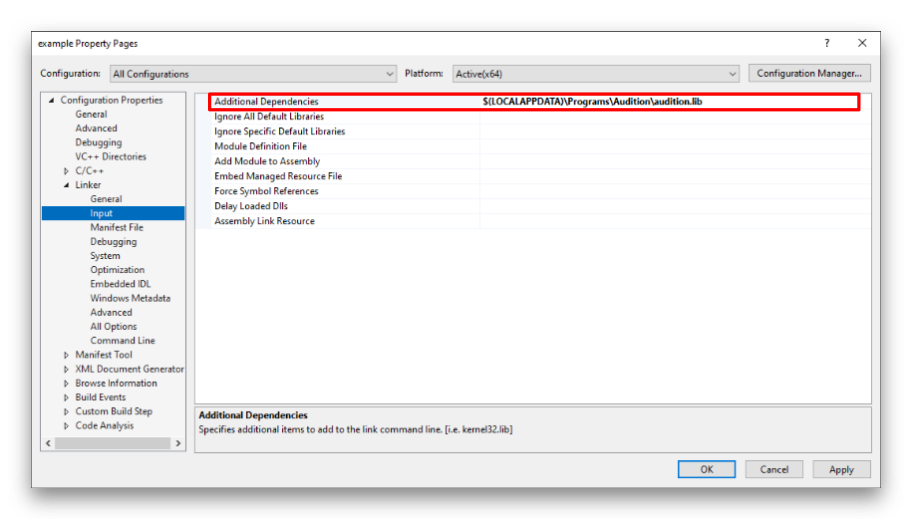
Next, under Configuration Properties ➔ Linker ➔ Input, add to the Additional Dependencies property the path to the audition.lib file.
Lastly, you need to copy the Audition.dll to the location of your test runner executable or add it the directory in which it resides to your PATH variable.
Discovering Audition with Xcode 🔗
This section explores how to manually configure Audition with your Xcode project. If you generated your Xcode project with CMake, then you can disregard this section because CMake configures it for you.
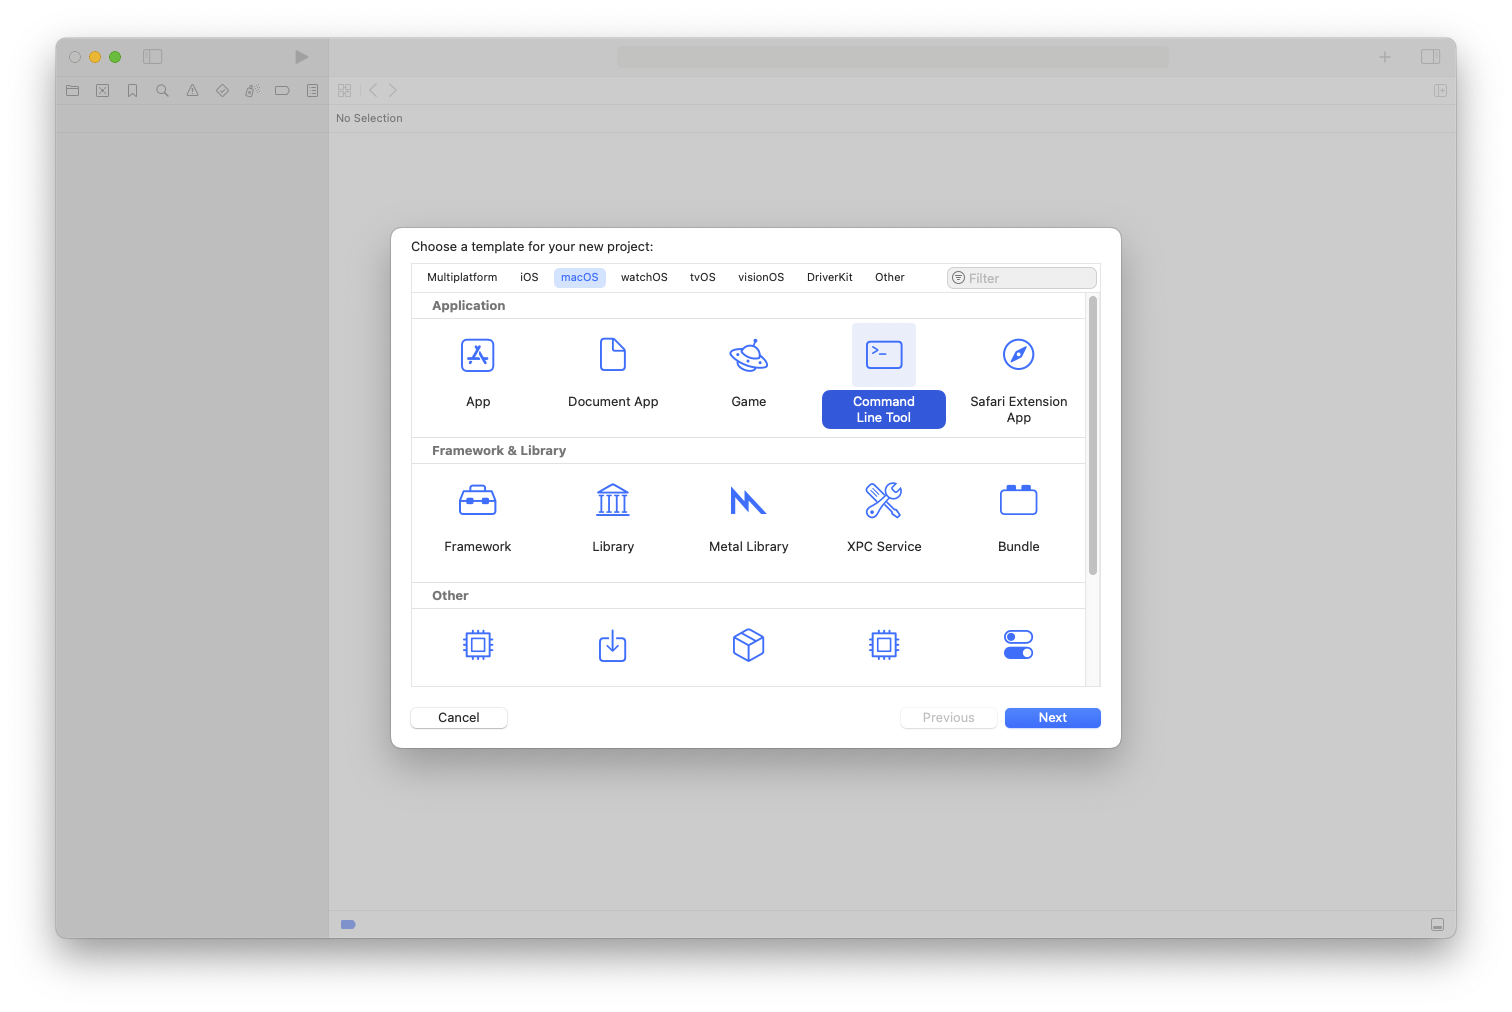
Firstly, you must ensure your test runner target is configured as a command line program. So if you’re creating a new project (or target) be sure you create it as a Command Line Tool.
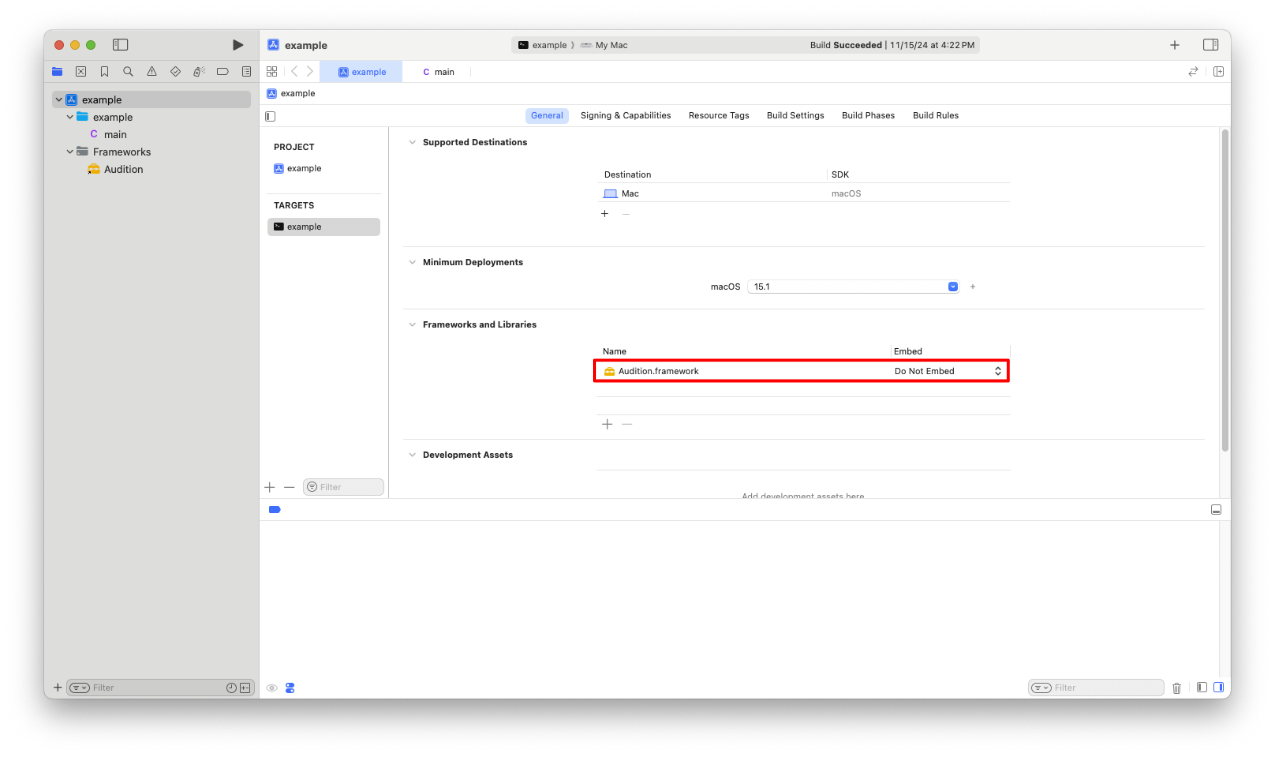
Once you have your target created, you must link it with the Audition.framework. You can link it by clicking the “plus” icon under General ➔ Frameworks and Libraries and then searching for “Audition” in the frameworks search box. If you cannot find Audition in the list, then you can add it manually by clicking Add Other... ➔ Add Files... or by dragging Audition.framework into the Xcode user interface.
This guide assumes you’ll add Audition as a reference rather than copying it into the project. Also, be sure that the Embed column has Do Not Embed selected.
Now that the Audition framework is linked, you must ensure your test runner executable can find the framework at runtime. If you fail to perform this step, you will receive a runtime error:
Library not loaded: @rpath/Audition.framework/Versions/A/Audition
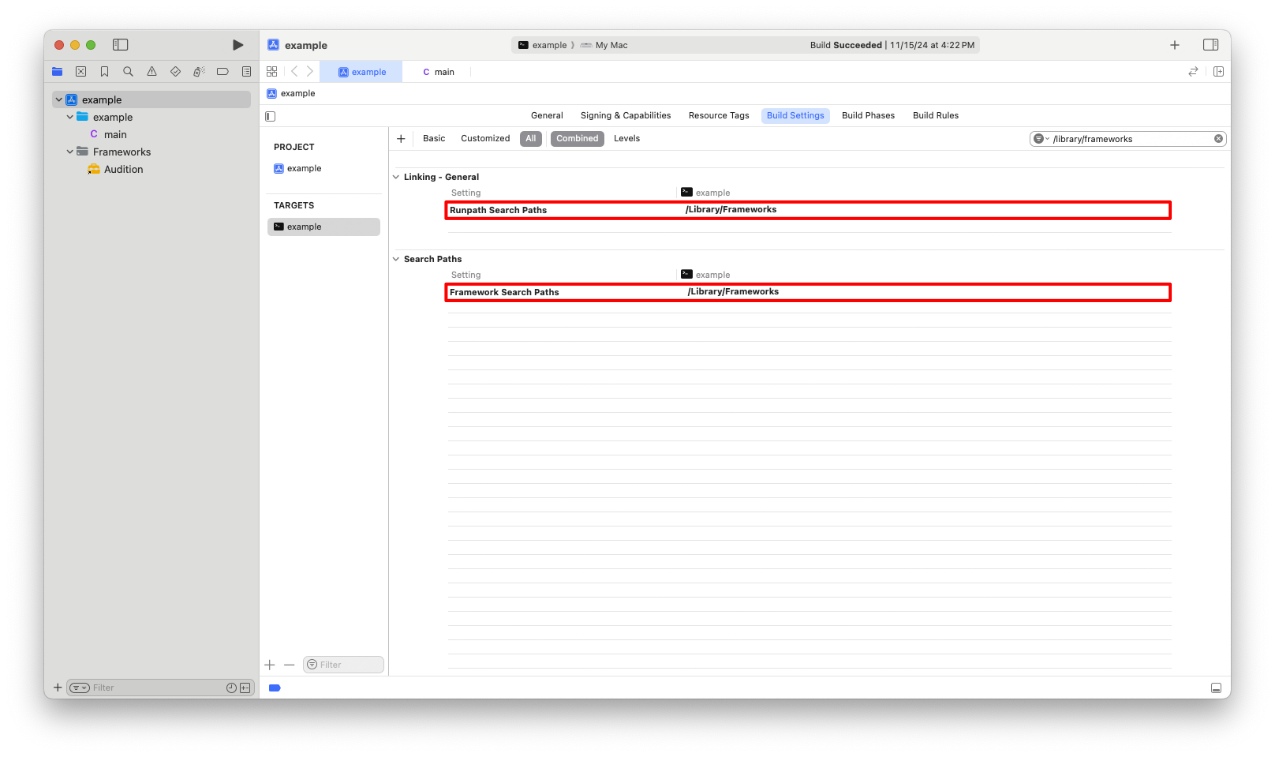
To ensure Audition is discoverable at runtime, you must set the Build Settings ➔ Runpath Search Paths and Framework Search Paths to the directory where Audition.framework is located. If you installed the Audition framework by dragging it into the “Frameworks” directory, as instructed by the DMG, then it will be located in “/Library/Frameworks”.
You’re now ready to use Audition on macOS! However, there is one “gotcha” and that is you will need to include the audition.h header file in a way that’s different from other platforms: On macOS framework headers are referenced by specifying the frameworks name first as a directory, then the header like so:
#include <Audition/audition.h>Right now, this is how you need to include the Audition header file. If you want to include the Audition header directly as
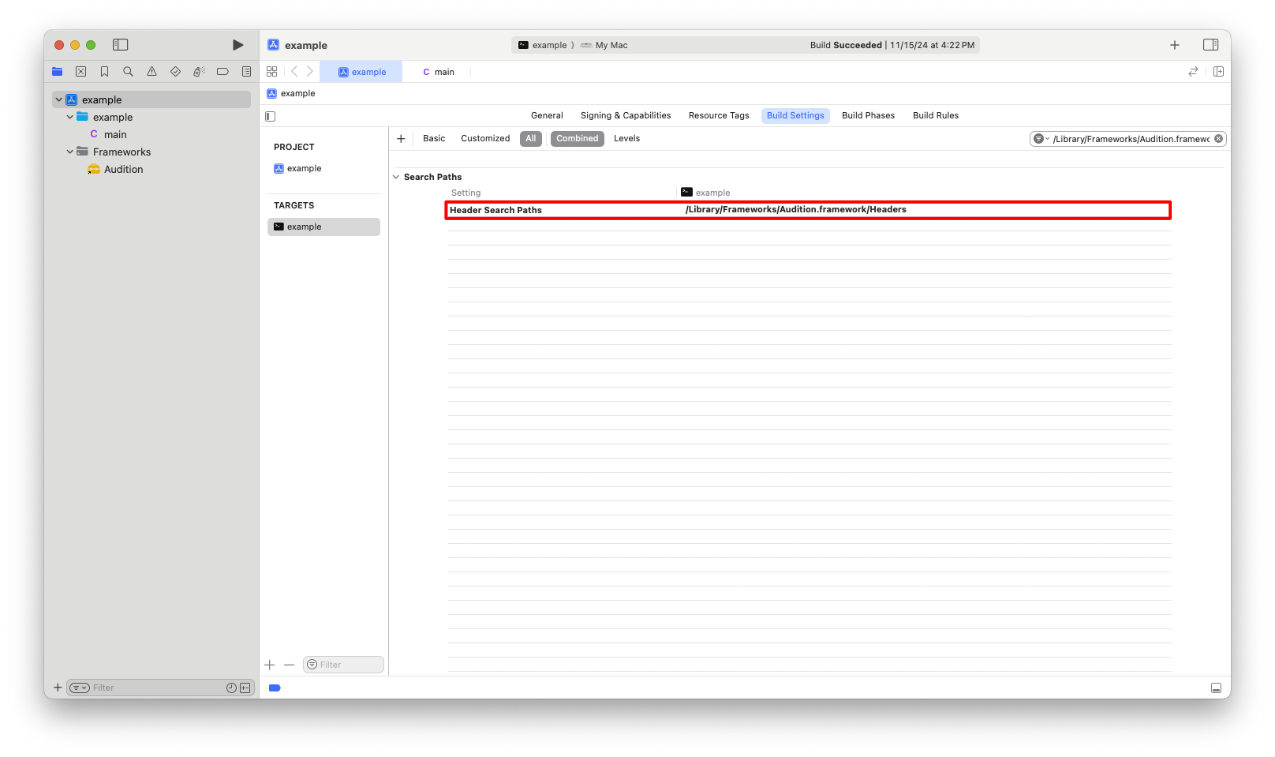
#include "audition.h"which is how it’s included on non-macOS platforms, then you must update the Build Settings ➔ Header Search Path option to reference the Audition header directory.
POSIX Considerations 🔗
On POSIX-compliant systems (e.g. Linux), the Audition public header file requires POSIX types and functions. These types and functions may require defining specific macros to ensure proper compilation.
Your C compiler likely already provides the necessary POSIX definitions, but if not, you’ll know because you’ll receive errors when including the Audition public header file (e.g. undefined function fdopen). If this happens, you must explicitly enable POSIX by passing the _POSIX_C_SOURCE preprocessor directive to the compiler. For example, if you’re using gcc or clang, then compile with:
$ gcc -D_POSIX_C_SOURCE=200809L ...
Defining this preprocessor directive instructs your C compiler to compile against POSIX standard 1003.1-2008, which is the minimum version of POSIX Audition depends on.

